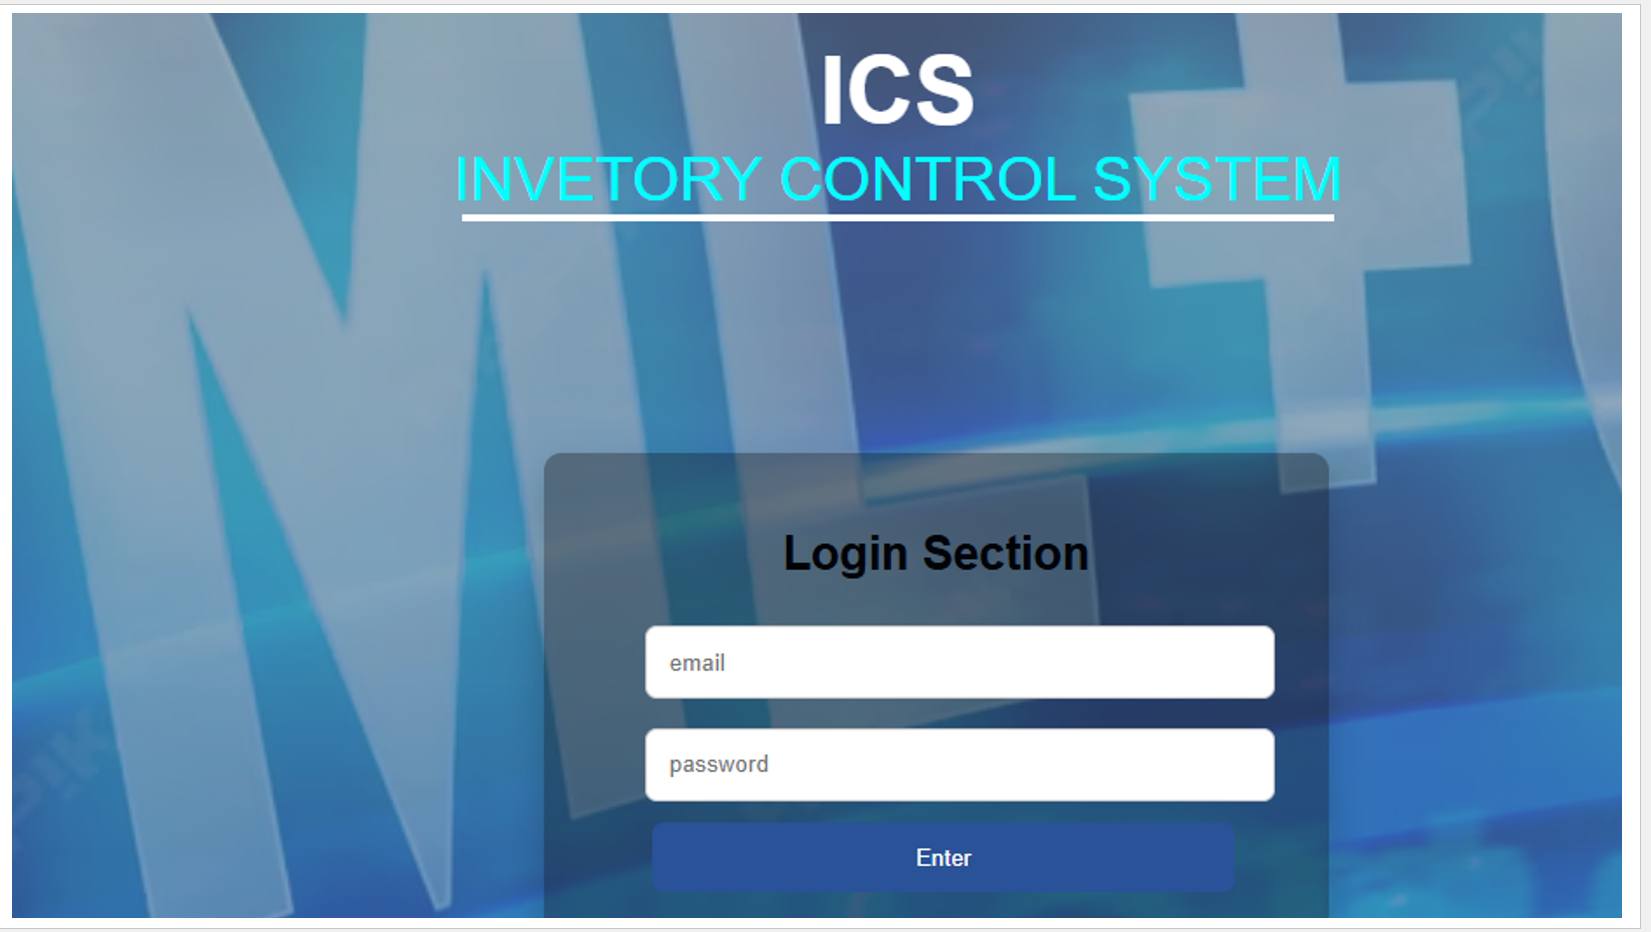
1. First Window:
This is the initial screen that will appear when you open the application.
2. Login Request:
It will ask for your email and password in order to access the system.
3. Validation:
• If the email or password does not match, or if the account is not registered with the necessary permissions, the system will display an error message.
• If the credentials are correct and permissions are valid, the application will proceed to the next section.
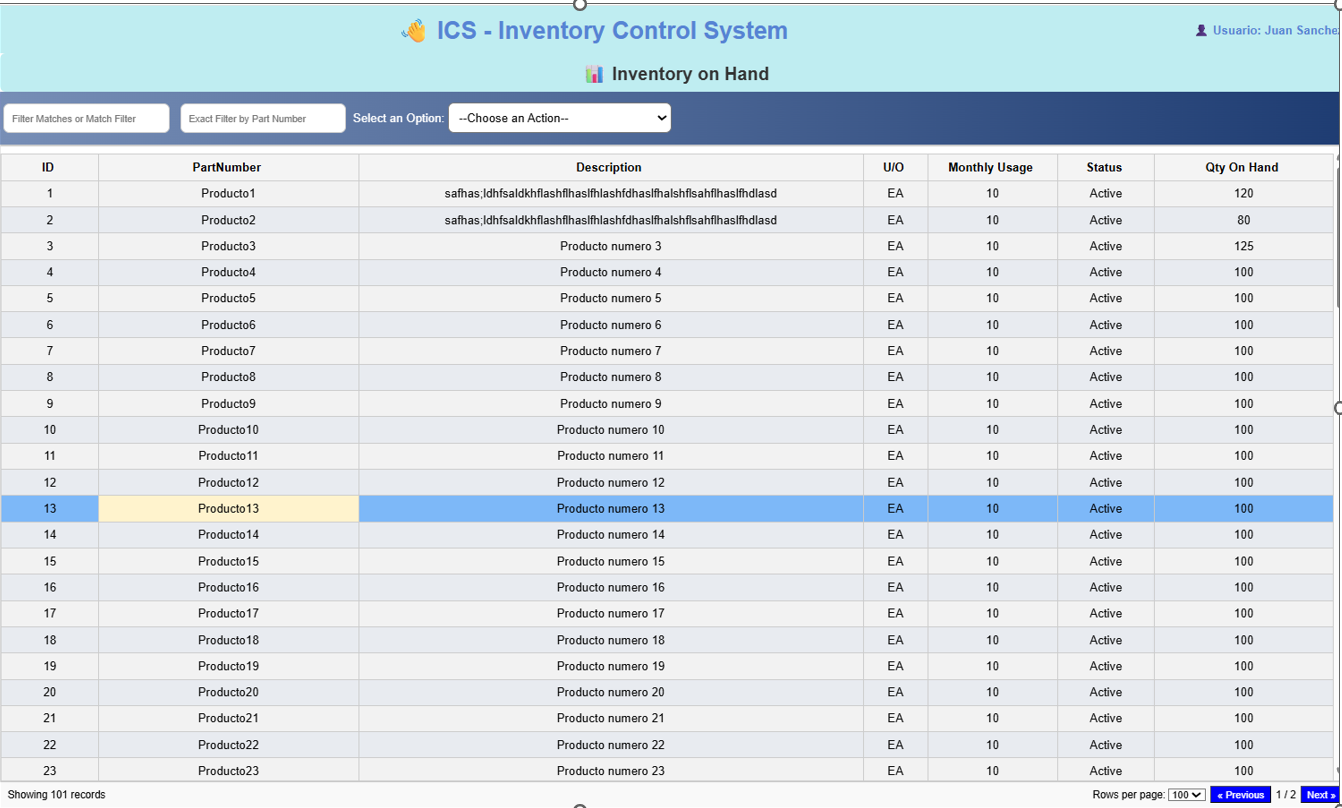
🔹 Inventory Window:
This window appears once you have successfully logged in. It displays the segregated inventory with the following details for each product:
• A unique product ID
• Product name
• Product description
• Unit of measurement
• Monthly usage of the product
• Product status
• Quantity available in inventory
📂 Navigation Menu:
• At the top-left corner, there is a dropdown menu.
• When clicked, it expands to the right and shows the program’s available options.
• On the top-right corner, the name of the logged-in user is displayed.
🔍 Filtering Options:
• Just below the menu, there are two input boxes for filtering the inventory:
• The first input filters by partial match.
• The second input filters by exact match.
📊 Export Feature:
• Next to the input boxes, there is a dropdown menu.
• This menu contains an option to export the inventory data to Excel.
• Exporting allows you to perform calculations or operations not permitted directly within the application.
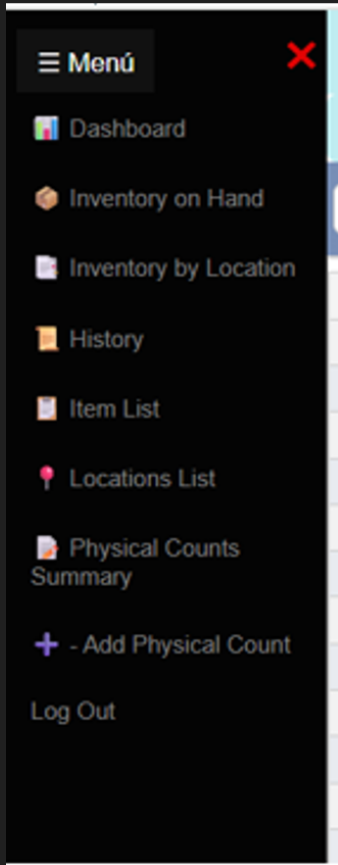
📑 Menu Overview:
In this section, you can see the contents within the menu:
1. Dashboard – The first option you will find.
2. Segregated Inventory – Displays the entire inventory in a structured way.
3. Detailed Inventory – Shows the inventory with more detail, including information such as the exact locations where items are stored, as well as other details explained later.
4. Transactions History – Accumulates all transactions generated. This record is very useful to clarify discrepancies and answer questions when something doesn’t match.
5. Preloaded Products List – Contains products loaded in advance, ensuring the program only allows or validates exact movements.
6. Locations Table – Helps validate movements by showing where items are stored.
7. Physical Counts Table – Stores the physical counts that are generated.
8. Modal Form for Counts – A modal form used to perform and record counts.
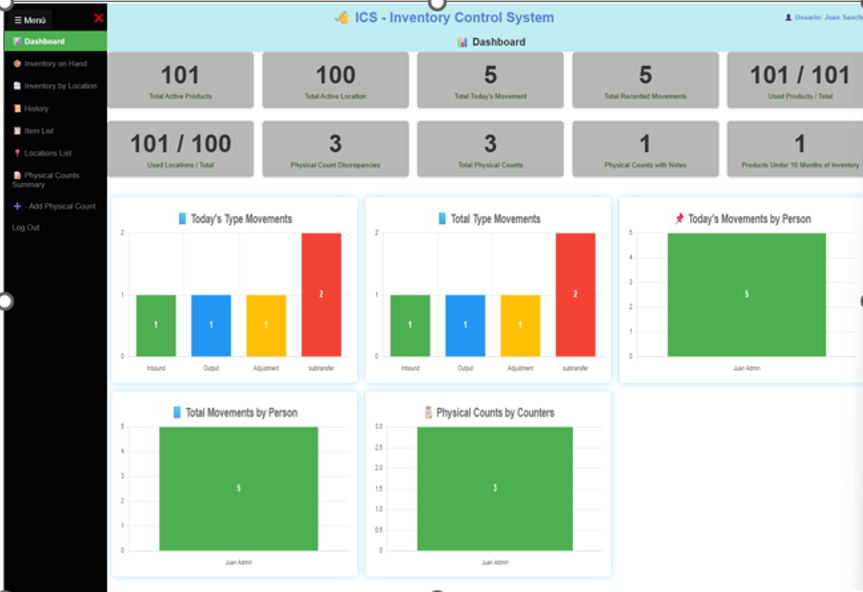
📊 Dashboard Overview:
When users access the Dashboard, they’ll find 10 summary cards and 5 charts that highlight key system data:
• Card 1: Total active products
• Card 2: Total active locations
• Card 3: Transactions recorded today
• Card 4: Total recorded movements
• Card 5: Active products with inventory
• Card 6: Active locations currently in use
• Card 7: Products with discrepancies during physical counts
• Card 8: Total physical counts completed
• Card 9: Counts flagged with notes
• Card 10: Products with less than 10 months of inventory

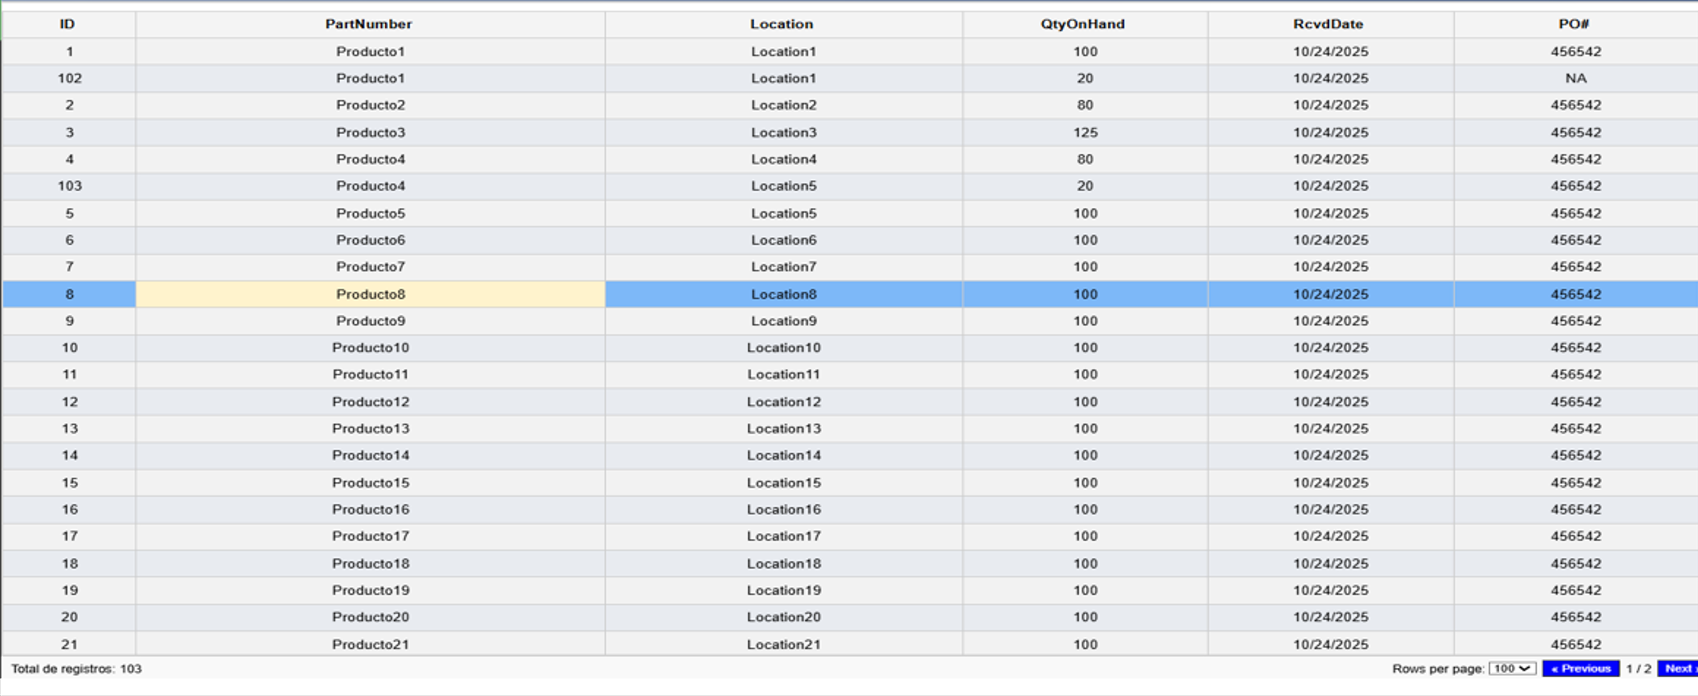
📦 Inventory on Hand
When you click on “Inventory on Hand”, you’ll see a complete view of your company’s inventory, including key details such as:
• Part number
• Product description
• Unit of measure
• Monthly usage
• Part status
• Total quantity available
🔍 Filter Options:
- The first input filters by an exact product name.
- The second input filters by starting characters, so you don’t need to type the full name.
📂 Dropdown Menu:
- Import Inventory
- Clear Inventory
- Export All Inventory to Excel
⚙️ Action Buttons:
- Sub‑Transfers – used to create sub‑transfer records.
- Take Product – used to withdraw or consume a product.
- Add Product – used to add a new product into the inventory.
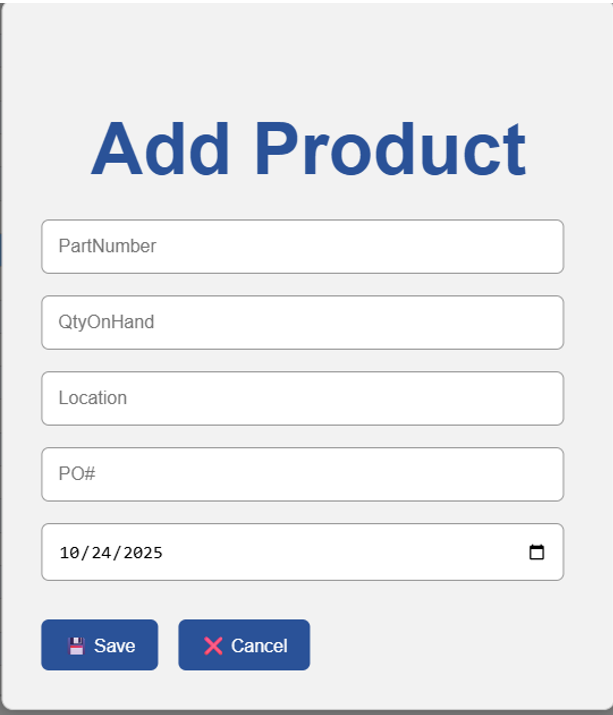
➕ Add Product Modal
This form is used to add new products to a specific location.
• Validates both the part number and location to ensure they exist in the system.
• Invalid or non‑existent entries are blocked to maintain data integrity.
• Every product added through this form automatically updates the inventory and records the executed movement in the history log.
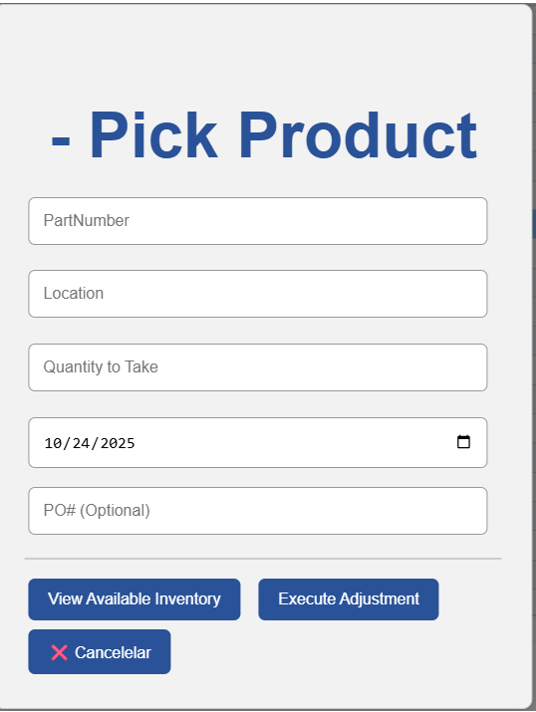
➖ Take Product Modal
This form is used to remove or consume inventory from a specific location.
• Validates both the part number and location to ensure they are valid.
• Checks the available quantity: if you attempt to withdraw more than what is in stock
(e.g., request 100 units but only 80 are available), the system will block the action.
• Every product removed through this form automatically updates the inventory and records the transaction in the history log.

📜 History
When you click on “History”, you’ll see a complete record of all transactions you’ve made.
🔍 Filter Options:
• The first input filters by an exact product name.
• The second input filters by starting characters, so you don’t need to type the full name.
📂 Dropdown Menu:
• Clear History Table
• Export All History to Excel
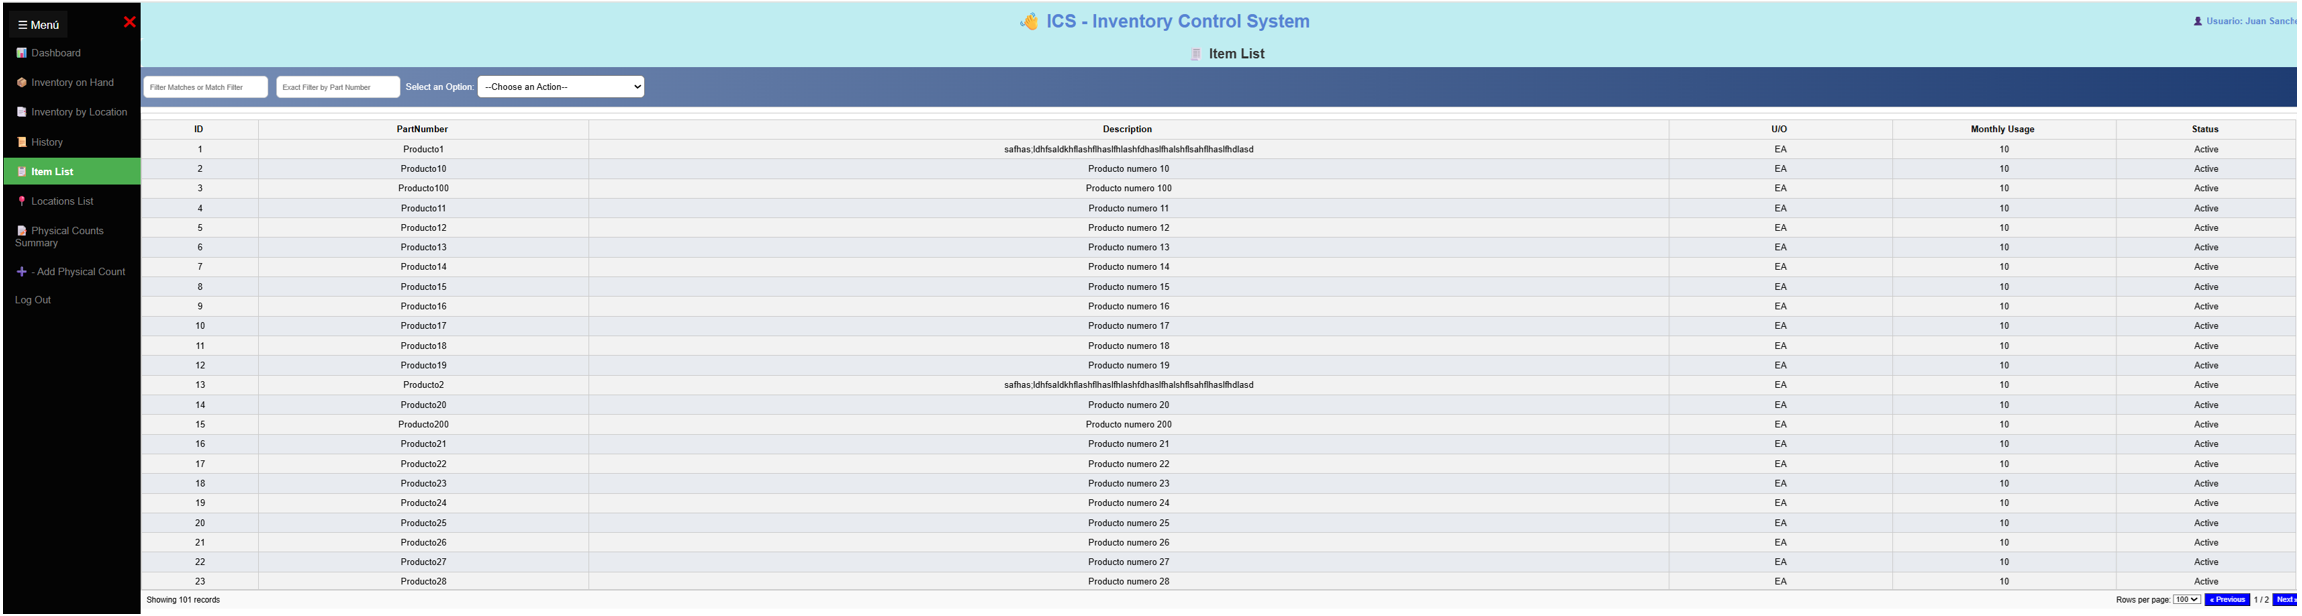
📦 Item List
When you click on “Item List”, you’ll see all active items in the system.
🔍 Filter Options:
• The first input filters by an exact product name.
• The second input filters by starting characters, so you don’t need to type the full name.
📂 Dropdown Menu:
• Import Item List
• Clear Item List
• Export Item List to Excel
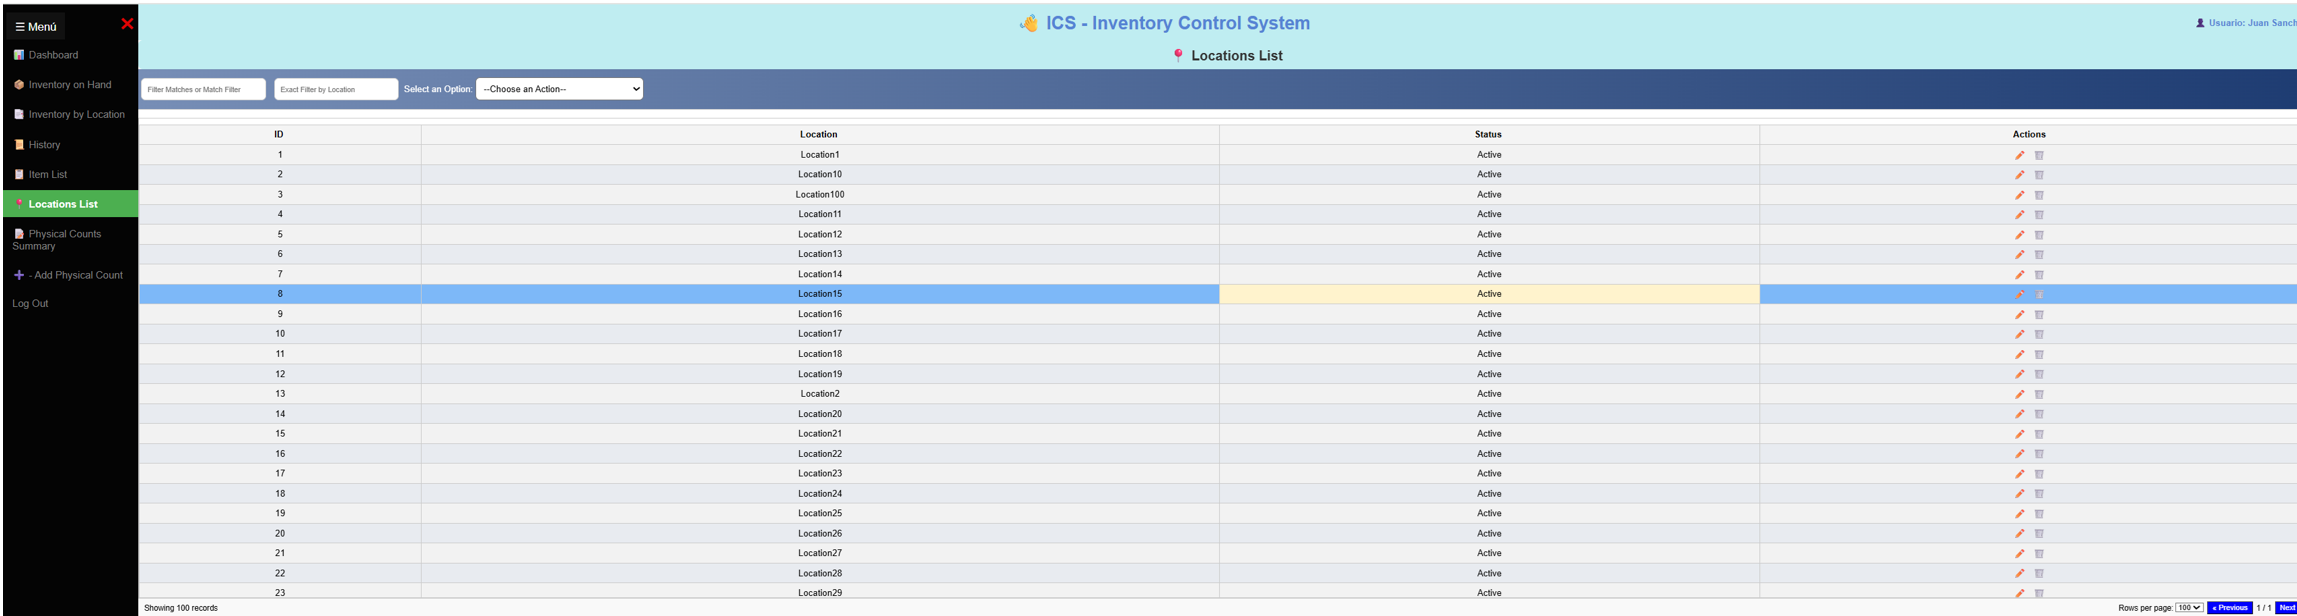
📍 Location List
When you click on “Location List”, you’ll see all active locations in the system.
🔍 Filter Options:
• The first input filters by an exact location name.
• The second input filters by starting characters, so you don’t need to type the full name.
📂 Dropdown Menu:
• Import Location List
• Clear Location List
• Export Location List to Excel
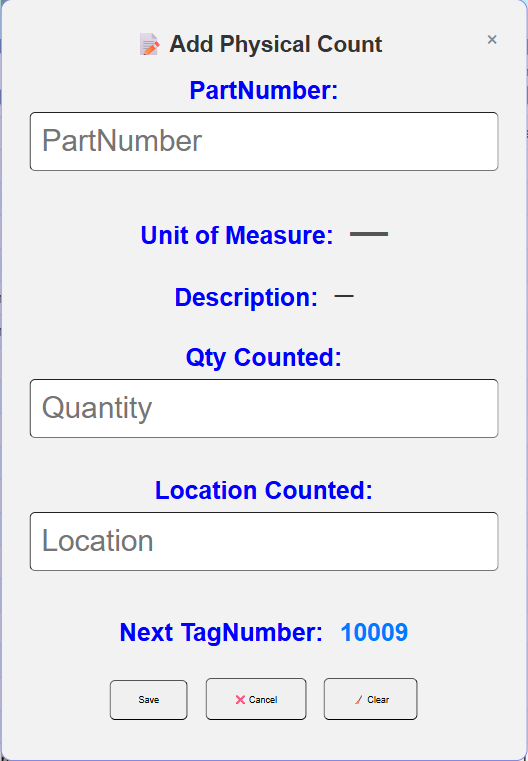
📝 Physical Count Modal
This modal form is used to generate physical counts.
• Enter the product name, unit of measure, and description. The system will verify whether the entered part number exists.
• Input the counted quantity and the location where the count is being performed.
• If everything is correct and you click Save, the information will be stored in the physical counts table.
• If the product name or location is incorrect, the system will display an error message and highlight the incorrect field with a red border.
• Once corrected, click Save again. After saving, the form is cleared and ready for the next count.
📊 Data Stored in the Physical Counts Table:
• Tag Number – unique sequential number assigned to each count.
• Product Name – name of the product counted.
• Description – product description.
• Counted Quantity – quantity entered during the count.
• Count Date – date of the count.
• Count Time – time of the count.
• Location – where the count took place.
• User Name – person who executed the count.
• Discrepancy Check – compares expected vs. counted quantity.
• Previous Quantity – shows what was recorded before the count.
• Editable Notes Field – allows comments after completing a count.
🔒 Access Control:
• Counts are filtered so that only the logged‑in user can view their own records.
• The administrator is the only person with permission to view all counts across the system.